LIGHTROOM PROCESS WORKFLOW

Intro
I often get asked about photography workflow and its something I take for granted after 13 years of using Adobe Lightroom. Upon reflection however, I do have a very rigid and process driven workflow that has a lot of automation. So id like to share this process and hopefully you can find some useful information that will help you with your photography.
Essentials
PC Specification
- Windows 10
- Intel Core i7 8700k
- Nvidia GeForce GTX 1060 GPU
- 32GB RAM
- SSD for boot drive
- NVME drive for Lightroom
- High speed SATA drive for images
- 16TB NAS
- Numerous external hard drives offsite
Importing Images
Its fair to say I am very diligent in my backup strategy both in the field, and at home. That is another article in itself so wont go into detail here. But this does start in the camera with a twin card slot Canon 5DsR. I shoot JPGs on an SD card and RAWs on the main Compact Flash slot. These are the ones I import, by selecting ‘Add’ to my Images drive.
I have over 120,000 images so its imperative I have an organised folder structure. Items such as ‘sports’, ‘fashion’, ‘holidays’ etc. For travel, I then break folders into date and location. For sport it will be into sport type and then date and event.
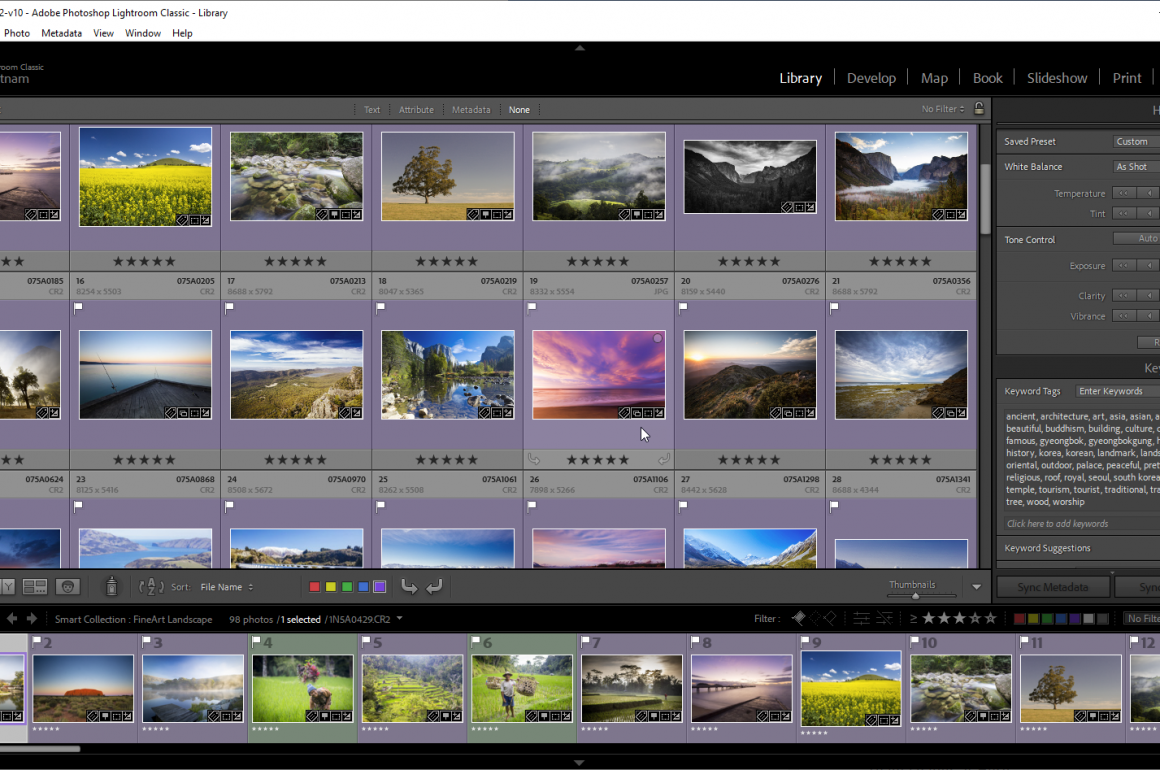
I always import into a ‘Misc’ folder first. This allows me to then separate into other folders. In the example on the right, these are places visited and my drone images. Sometimes I have a ‘driving’ folder for images quickly taken on the road. Usually the Misc folder ends up quite small in size.

Import options are fairly limited in Lightroom but some serious time saving can be achieved. Firstly I always import and generate 1:1 previews. It takes longer to import, which is a great time to get a coffee, but will speed up your editing later. Especially considering you are likely to work your images soon after import, and can automatically delete these large previews after 30 days in Lightroom’s preferences.
I use metadata settings for any event I am shooting for agencies. I usually start with a fairly generic headline and caption etc that will at least correctly set the event, location and date. This means that if I accidentally miss it later, I at least have some basic metadata. Same goes for keywords. Just some simple ones for any import can not hurt. Maybe location and subject eg ‘Melbourne, Australia, sport, MCG, football’. This applies to all types of photos I shoot. More on that later.
For develop settings I often will automatically apply my ‘stock profile’ as it really gets me 90% there 90% of the time. This can seem lazy but in reality, everyone targets a slight exposure bump, some saturation, some contrast and some luminance as a minimum. Incidentally this profile is available for sale on Photo Basecamp (shameless plug).
That’s about it for import for me, so time to start the process and get that cup of coffee. My desktop PC is pretty quick, despite Lightroom’s obvious flaws in this area of speed. My Surface Book 2 is really showing signs of slowing and must be plugged in to power for full power setting. My main camera does shoot 50megapixel RAWs which are around 65mb in size. So there is that consideration also. JPGs that I often shoot at sport events are much quicker.
Viewing and Selecting Images
So after that strong cup of coffee, you are ready to really start reviewing and selecting images. Many people dislike Lightroom for this reviewing part and I have to agree, its slow. I have used tools such as Photo Mechanic which is blistering fast at reviewing and tagging. I however find that the work involved in integrating back into Lightroom later makes it a similar overall time for me. So I persist with the slowness of Lightroom for simplicity.
I make extensive use of Lightroom’s tagging with keyboard shortcuts with the following rules:
- 1 star – This is a chosen image to edit and work with
- 3 star – This is an image that I really like and will sell on my website www.filedimage.com
- 5 star – This is a portfolio image trhat is also for sale on my site
The vast majority of my shooting is for stock libraries. For this I also apply the following rules when selecting images:
- Pick flag – This is actually me being a bit obsessive. Many years ago Lightroom had issues with flags and would lose them. So I just started applying 1 star and flag to every chosen image. I believe this is not an issue now but you know, its hard to shake off some habits
- Reject flag – Image for deletion. Applied from Photo menu
Next up are colours. I have my own set of personal rules as follows:
- Green – These are images that have been uploaded to stock libraries. So once all editing (including metadata) is complete an image uploaded to stock library will always have a star rating, a flag and be green.
- Yellow – For large folders of images I will sometimes temporarily use yellow. This enables me to filter effectively (inc flag or star) within a folder for copying and pasting metadata in a batch. Sometimes images might be similar, but not in capture time order. Once editing complete and image exported, then it is turned to green
- Purple – I upload a subset of stock images to fine art libraries and these will be purple in colour.

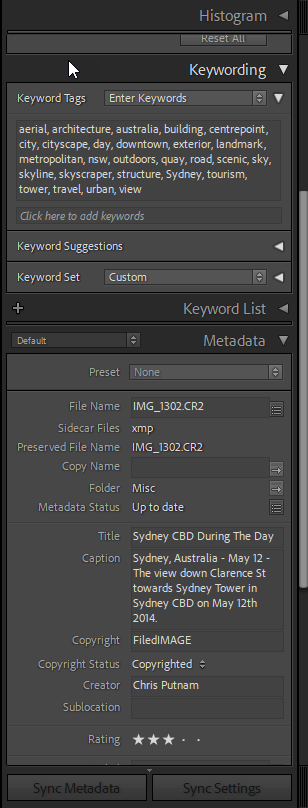
Phew that seems like a lot, but there is another step that gives you an extra ability to filter effectively…metadata. If you upload to any stock agency or editorial agency then it is a fact of life, you will spend too much time doing metadata. The more detail you provide, the higher chances of selling. The example to the left of a stock image in Sydney is a good example of what I do. It has detailed keywords, a title and a caption that must be exactly as per agency rules. Especially if it is an editorial image. Some agencies require more fields in IPTC, but mostly it is these three fields. If you are not uploading anywhere else then it is still good practice to fill these fields out. The main reason would be for the ability to do a text filter search in the library module of Lightroom. You can select all your images and search for any image by a piece of text. Especially useful if you have visited a location many times and have many folders of images. A second good reason is that many places you might send an image will make use of this metadata to provide captions. For example, Facebook and most web hosting sites.
Upload Automation
The 1,3,5 star tagging process may have seemed over the top at first, but the magic happens here. With the use of collections and plugins I am able to automate uploads to sections of my website, ie portfolio and shop.
My website is hosted on Zenfolio and the excellent Jeffrey Friedl (http://regex.info/blog/lightroom-goodies/zenfolio) makes many great Lightroom plugins for various tasks. One of these is a Zenfolio plugin that can receive the directories on my site, then setup an automated rule. An example can be seen below. In this instance any 3 star rated image with keyword of ‘act, cityscape’ will co into that folder for purchasing on Zenfolio. All I have to do is press publish. It syncs deletes also. So if you decide an image shouldn’t be online anymore, you simply remove the 3 star in Lightroom and the plugin will recognise this and remove from Zenfolio. Very clever.
In the standard collections section in Library module I will occasional do other collections. Perhaps I need to do a tear sheet for sports accreditation. So I can make a custom filter based upon keywords and stars etc etc.
Of course the possibilities are endless with what you can do with collections but this is how I mostly use them. There are some built-in publishing services to Flickr and Adobe Stock etc. I haven’t used these but clearly they could work for some people.
Exporting Images
I dont think I do anything special in exporting other than setup user presets for what my use case is. Facebook will be a smaller image, perhaps with a watermark. Agencies are generally full size and 100% quality for me. In the example below I export to a folder based upon date. Then at end of month I will copy and paste all the exports into one folder and then copy to my Onedrive for backup. This is on top of my pedantic backup process, which is another article featuring soon.


Leave a Comment